
Let’s face it, sometimes when you’re dealing with another customer’s artwork it can be tough to get them to send you the correct file. You might request that they send you print ready vector art and all they have is a screenshot pasted into a Word Document. When you finally get vector art from them, you try to open it in Illustrator to print and WHAM! Font problems.

This means that you have a PDF or Illustrator file that contains text that was NOT converted to outlines. Which means your customer’s art has fonts that you don’t possess and now you can’t do anything but pester them for a new file. If your computer doesn’t have those fonts installed, Illustrator will replace them with system default fonts and it just won’t look the same.
So while your customer created their art to look like this:

It actually looks like this when you open it in Illustrator:

Not cool.
Sometimes it can be tough to explain to a customer that they need to convert their text to outlines or maybe they’re using a premium font and you just can’t justify buying a font for this one print job. Either way, there’s a quick way to convert the text to outlines in Adobe Acrobat.
First I open the the file in Adobe Acrobat. When the file is opened in Acrobat, the font is rendered correctly because it is embedded into the PDF.
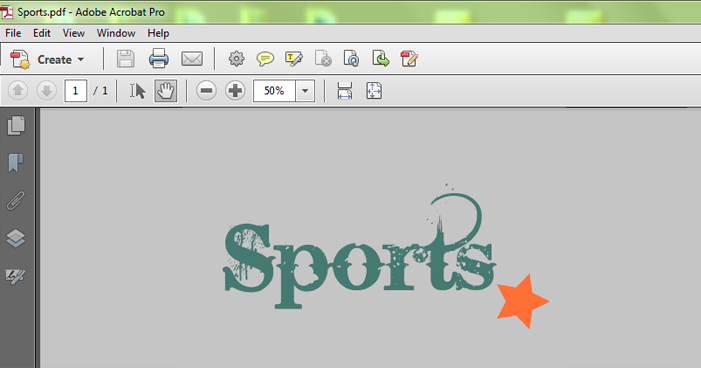
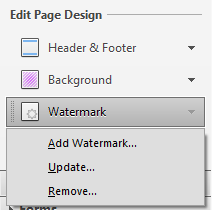
Next go to the “Tools” bar and select Watermark > Add Watermark. This will bring up the Watermark menu.
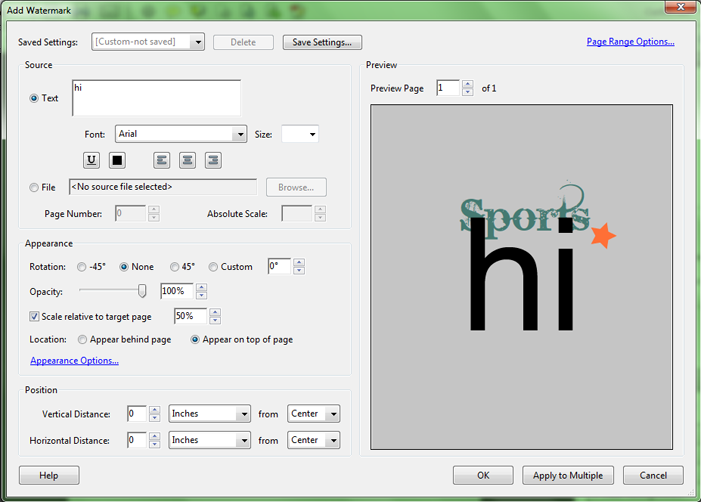
From the Watermark menu, type something into the “Text” box. This will be your watermark. It doesn’t matter what you type in here because in the end we’re not even going to see it. It’s just a little trick you’re playing on Acrobat. Also, what is important is to make sure your watermark does not cover up any of your actual artwork. So move your watermark text using the “Position” options until it is away from your artwork.
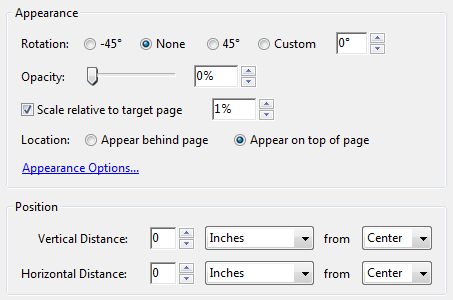
Then change the opacity to 0% and lower the scale and press OK.
Next we’re going to go back up to the “Tools” bar and select Print Production > Flattener Preview.
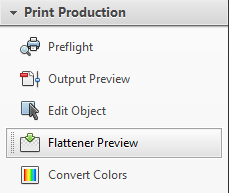
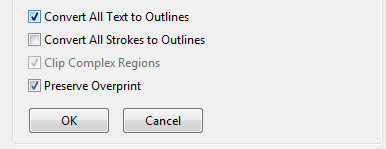
In this dialogue box, find a check box called “Convert All Text to Outlines” and then hit Apply. You MUST hit Apply for this to work. Say OK and then save your file.
Open your newly saved PDF in Illustrator again and you should have no more font problems. Your watermark is still there though and you can simply find it and delete it.

And that’s it.
I’ve tested this on all version of Acrobat and Illustrator CS3 and up. Let me know in the comments below if this trick works for you.
This article was originally posted on my personal blog and I received so many comments from readers, most of whom work at print shops, telling me that it was helpful to their workflow, that I decided it deserved a place here too.


Comments (18)
June 16, 2015 at 9:26 am
why is the watermark step needed. in flattener preview there is an option and it seems to give the wanted effekt.
And, about the watermark, I put it outside the clip marks, in order to get it cut away at the end and avoid problems. (murphy law)
June 16, 2015 at 5:33 pm
Hi Anders. I do not know why adding the watermark is the secret ingredient. It would seem that just going to flattener preview right away and selecting “convert text to outlines” would be all that you need to do but for some reason it doesn’t work that way.
Please let me know if you’ve accomplished this without adding a watermark because I can’t seem to replicate it. Also adding the watermark outside the clipping marks sounds like a really nice solution. Thank you for sharing that tip!!
June 25, 2015 at 1:12 pm
The watermark is needed because Convert Text to Outlines is a function accomplished by the Transparency Flattener (that’s why this is done in “Flattener Preview.”) Anything that *doesn’t* go through the flattener will not be affected. So, by adding a *transparent* watermark, you are forcing the document to go through the flattener, and thus enabling the option to work.
The Flattener processes the PDF and takes transparency and other effects that are layered atop eachother–that are only available in newer versions of the PDF standard–and “flattens” them down to images and vectors without layers. That can involve significant processing AND a large increase in file size if there are a lot of effects in the document. (For example, shadowed text on top of images running across a whole spread might cause large portions of the spread to become an image file.)
Normally, you would want to work with un-flattened PDFs. It is usually better for the RIP at the press to manage transparency and overprinting, and the color transitions that happen with them. However, sometimes complex transparency causes an error at press and you want to flatten the file before sending.
So, the Flattener gives us a work-around to convert text to outlines, however, it’s forcing the document to go through a whole other type of processing as well.
June 25, 2015 at 1:33 pm
Very awesome explanation of that process Joe. I guess the question is why is “Convert Text to Outlines” even a selectable option if you don’t have a watermark applied to your PDF and it wont do anything. Trying to convert strokes to outlines doesn’t work without it as well.
The “Transparency Flattener” in Acrobat is presented to us and looks the same as the Transparency Flattener from Illustrator but it’s weird that they don’t function the same way.
So normally it would just be used to flatten “effects” in the art work if you are having problems on the press. Got it. Again thanks for this explanation because I honestly couldn’t tell you exactly what was going on behind the scenes to accomplish this.
September 22, 2015 at 8:21 am
Hi,
this is great! Just on question, it seems that the Flattener Preview, when applied, kills all bookmark actions/targets (i.e. bookmarks are still there, but not working anymore),
Anything that can be done about this?
September 22, 2015 at 11:45 am
Hey David! I assume you have an interactive PDF perhaps with hyperlinks like from the table of contents to the page numbers or maybe hyperlinks within that lead to other content when clicked? Those are being destroyed when going through the flattener preview.
I do not know of any solution to that actually but I will look around and see if this has come up. Thats actually not something I’ve tested. I do feel that if your client is providing a large interactive PDF they need to provide the fonts in that case because you’ll want the text to probably remain as text. But thats just my opinion.
May 26, 2016 at 11:21 am
Casey, you are awesome to have shared this tip! I work in prepress for an offset printer and I swear I have converted text to outlines before just using the Flattener Preview without the Watermark but I could not get it to work today. So I went googling for an answer and found your blogpost 🙂 I’m guessing when I did this before that there were was something else on the page that was a transparency and that’s why it worked then, but this time there was not. Anyway, thank you for your help relieving my frustration!
May 27, 2016 at 10:15 pm
You’re very welcome Nancy! Yeah this tip has saved me a ton of times. Usually when someone sends me some last second art. I’m glad I could help you in your time of need 🙂
November 28, 2016 at 4:28 pm
Alternately, place your pdf in an illustrator document and save it as a pdf v 1.3 and under “advanced/custom” click on “convert all text to outlines”.
November 28, 2016 at 7:24 pm
Thanks for the tip Jay! Gonna try this out.
February 10, 2017 at 3:38 pm
Another option is to open the file in Acrobat, go to – File – Save As – More Options – Encapsulated Post Script (.eps). Works like a charm.
February 13, 2017 at 11:22 pm
Their are actually more ways in converting fonts, but the best way is using illustrator. Anyway, Thanks for sharing.
Bruce, https://www.printavo.com
April 20, 2017 at 3:06 am
Thank Casey… worked a treat! I have been a graphic designer for 30 years and usually pride myself on finding work arounds with pdf issues but I too couldn’t get the text to outlines as I have in the past… thanks for sharing!
April 22, 2017 at 3:39 pm
I’m glad I could help Jason!!
May 24, 2017 at 5:53 am
Thanks for this tutorial. It works like a charm. The “save as .eps” usually also works for simpeler files, but has more trouble with the more complex files.
September 13, 2017 at 6:27 am
Thank you so much! I’ve been fuzzing around with a few tutorials for ID and Ai, but this Acrobat trick seems to be the only one which is still working with Creative Cloud 2017. And yes, we’re all still racked with wrong formats, non-outlined fonts, screenshots of logos in Word files, and bosses thinking they can teach us how to copy and paste logos…
October 10, 2017 at 2:17 pm
Awesome tip. I never knew you could convert fonts to outlines in Acrobat and I will be using this in the future!
March 28, 2018 at 11:00 am
Thank you, thank you, thank you! I use a program called “Pitstop” to do this, but it was very expensive and you pay per license. All I used it for was converting fonts so I could not justify the added expense for other users. I am so glad to have found this work-around so we can convert fonts on multiple workstations. Did I say “thank you”? 🙂