RIP software is pretty important to the print shop workflow because it gives you outstanding control of your halftones, allows your wide format printer to handle large file sizes without locking up, and more importantly it saves you time. Usually you can hit print from your art program, select your RIP software and halftone settings and out come some purty lookin’ films.
But it is expensive, man. The more popular programs like AccuRIP and Wasatch SoftRIP (for a milder, gentler, kinder RIP) can cost $600 and up to $2,000 with all the bells and whistles. If you’re a newbie printer you probably don’t have that kind of cash lying around to spend on some software, which frankly, when you’re just starting out will only be used to print film with halftoned artwork and that’s it.
I’m not going to get into exactly what RIP software is in this post. That will be for another day. But for now, let’s learn how to print halftones without RIP software.
Do it cheaply in Illustrator and Photoshop
So if you watch the video above I will show you how you can get your nearly print-ready vector artwork, truly ready to print by converting each color into separate monochrome bitmap files. Sounds like techie wizardry, but it will save you a ton of money until you’ve got enough to buy some RIP software. Hopefully you wont have to sell your car to afford it instead.


Comments (16)
June 25, 2015 at 2:12 pm
Hi casey!
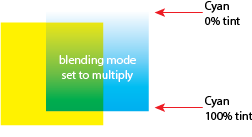
Thank you so much for this info… it is exactly what I need to know… except…. I am trying to understand the gradients. So, in order to achieve the different colors but with using the same 4 colors you put gradient using the halftone percent change on both sides of the slider so example 20% on red to 70% on the other side and then used the multiply to achieve the various colors? Correct?
June 25, 2015 at 3:01 pm
Hello Vida! Great question. Sorry I just kind of skipped over that gradient info. Yes to achieve those different colors I have a solid block of one color and then another color over it with the blending mode set to multiply. This will allow both colors to print on top of each other without the top color blocking out the bottom color. And yes on the gradients I have one end of the gradient set to lets say 100% Tint of a spot color all the way down to 0% tint of that same spot color and then it is set to multiply.

September 21, 2015 at 6:56 pm
Casey come on buddy tell her that that’s called overprinting and can get you more colors with less screens. For more money in your bottom line
September 21, 2015 at 10:56 pm
Ha thanks Lee! Thats actually a way better explanation. Vida, if you’re still checking in, listen to this.
November 12, 2015 at 2:31 pm
What kind of printer do you use to print out your films ?
November 12, 2015 at 9:42 pm
Hey Fab. I use an Epson 7800 which is a super wide format printer. I think you can print up to 24inches wide on it. I dont have that at home, its at the shop my wife works at and I just do it there and bring the films home. Its a behemoth and super expensive so its not really economical if you want something for printing films at home. For home you should look into getting any sort of Epson inkjet especially one that can print glossy photos because that will be the setting you will want to use when printing your films. And I do only recommend Epsons. They’re the best for printing films in my opinion. Doesnt have to be an expensive one. Look into Epson 1400s.
November 16, 2015 at 9:37 pm
Thank you so much for reaching out. I’ll definitely do my research and look into it.
God bless you !
January 6, 2016 at 3:43 pm
You’re extremely welcome Fab! I’m glad I could help.
November 16, 2015 at 9:41 pm
Have you ever thought about teaching a class or skillshare.com
Please checkout it’s a great leaning resource and inspirational.
January 6, 2016 at 3:44 pm
I was actually going to try to put up some online courses here on the blog sometime in the future. Not quite sure when but I know it will be a lot of work. Thanks!! Also sorry I am just replying to these comments.
August 3, 2016 at 12:40 pm
Hello! I just started learning screen printing and I find this tutorial awesome, but I have a question. When I want to save the image as PDF I can’t choose Adobe PDF 8.0, I only have one option Adobe PostScript File. That is I can’t change anything. Could you pls help me with this?
August 4, 2016 at 11:08 am
Hi Rebeka. Do you have Adobe acrobat or adobe reader installed? If not you may need to reinstall. If you only have the option of PostScript, you can also run the postscript file through Distiller or Preview(on Mac) and it will spit out a PDF for you as well.
April 6, 2017 at 1:37 pm
Hello Casey,
I was wondering if you know if the Pixma Pro 100 would be able to print out film like in the example video above?
April 6, 2017 at 10:37 pm
Hey Cesar! Yes that one looks like it should be good. Especially because of the dye ink it uses which will give you darker richer blacks. Make sure you are selecting “greyscale” in the print dialogue and setting it to high quality print. I just got a Canon Pixma IX 6820 and I select Photopaper Matte as the media and I get really good results. If you are wanting something a little cheaper, check out that one. It has a lot of the same features although it doesnt have as many cartridges and only has one dye ink black and one pigment black in addition to CMY. Let me know how the Pixma Pro works for you if you get it!!
April 12, 2017 at 1:08 pm
Where would I make the adjustment for this “print dialogue and setting it to high quality print”?
August 28, 2017 at 11:58 pm
Yeah RIP software is quite very expensive, this post really helpful, thanks for sharing valuable information.
Bruce, https://www.printavo.com